Creating consistent, branded content is crucial for any business or personal brand looking to establish a professional and cohesive online presence.
A brand kit in Canva can streamline this process, making it easier and faster to produce content that aligns with your brand’s identity. With a quality brand kit, anyone can create on-brand, quality content without having to hunt down assets.
So…
WHAT IS A BRAND KIT (& WHY DO YOU NEED ONE)?
A brand kit brings together all assets of your brand into one location, to provide drag-and-drop options for content creation. Once established, it contains everything your brand could possibly need, including..
- Fonts
- Logos
- Colors
- Graphics/Images
- Sounds/Music
- Even full templates
This allows you to have a full brand guide, a document that usually spans 10+ pages and isn’t directly interactable, available in a simple-to-use scroll down menu. As it exists natively in the platform you’re using to create the content, it also cuts out the time sourcing materials, allowing you to spend more time actually creating.
Just a few benefits include…
- Consistency: Ensures all your content looks cohesive, reinforcing your brand identity.
- Efficiency: Saves time by having all your brand elements in one place, ready to use.
- Professionalism: Creates a polished and professional appearance for your brand.
- Recognition: Helps your audience easily recognize your brand across different platforms.
- Convenience: Simplifies the content creation process, especially for teams or agencies working with multiple brands.
Convinced? Awesome! Now let’s get started actually building it…
STEP-BY-STEP GUIDE TO SETTING UP A BRAND KIT IN CANVA
PS. Want a video to follow along with? Our very own “Black Ops Ninja” Jules De Armon made this incredible guide to walk you through everything needed to set up, optimize, and use your new Brand Kit!
STEP 1: ENSURE YOU HAVE A CANVA PRO ACCOUNT
To access the brand kit feature in Canva, you need a Canva Pro account. This account provides additional features, including access to premium templates, videos, images, and fonts.
The Pro account is available for around $12-$14 per month.
STEP 2: CREATE A BRAND KIT
- Log in to Canva: Start by logging into your Canva account.
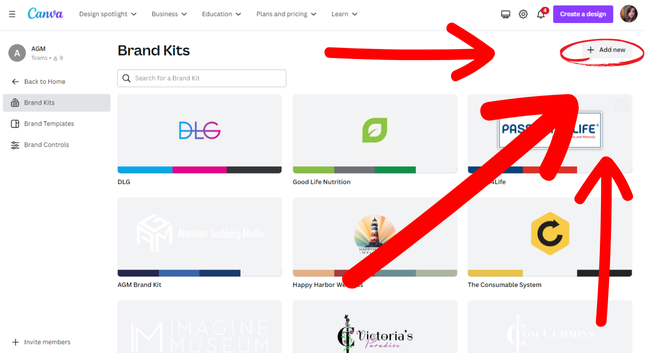
- Navigate to Brand Kit: On the main page, go to the left-hand menu and click on “Brand” under the “Tools” section.
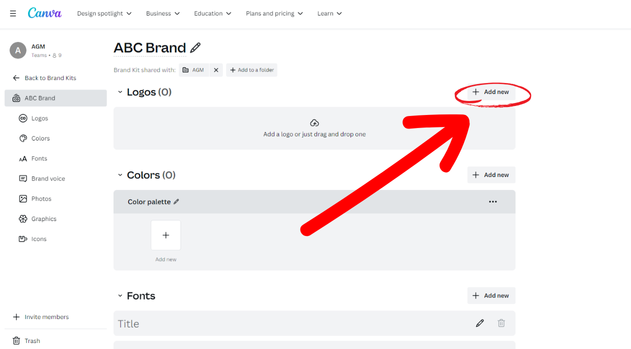
- Add New Brand Kit: Click on “Add new” and then “Brand Kit.” Give your brand kit a name, such as “(Name) Brand Kit”

STEP 3: UPLOAD YOUR LOGO
- Prepare Your Logo Files: Ensure you have your logo files ready. Canva supports various file types, including PNG and SVG. It’s best to use a PNG with a transparent background.
- Upload the Logo: Click on the “Upload” button to add your logo files to the brand kit. Canva can automatically detect and import brand colors from your logo, which is a convenient feature.

STEP 4: ADD BRAND COLORS
- Automatic Detection: If your logo is uploaded, Canva might automatically detect and add your brand colors.
- Manual Addition: If Canva doesn’t detect the colors or if you want to add more, you can manually input the color codes. Click on “Add new color” and enter your specific brand color codes.

STEP 5: SET YOUR BRAND FONTS
- Choose Fonts: Canva offers a wide range of fonts. Select the ones that align with your brand. Common choices like Montserrat can be a good starting point.
- Upload Custom Fonts: If you have specific fonts not available in Canva, you can upload them. Click on “Upload a font” and add your custom fonts to the brand kit.
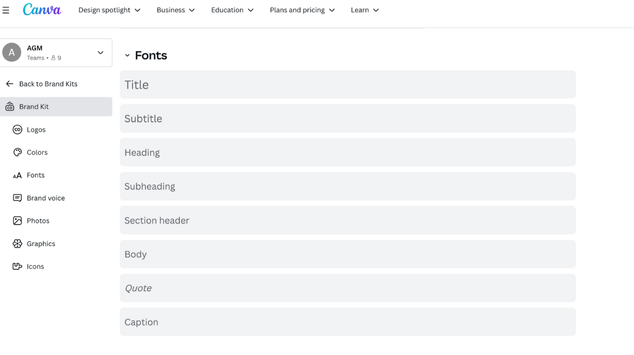
- Assign Fonts: Set your primary font styles for headings, subheadings, and body text to maintain consistency across your content.

STEP 6: UTILIZE YOUR BRAND KIT IN CONTENT CREATION
- Create a Design: Start a new design by clicking “Create a design” and selecting the type of content you want to make, such as an Instagram post.
- Apply Brand Elements: With your brand kit set up, all your brand elements (colors, fonts, logos) will be readily available in the design editor. This allows you to quickly apply your brand’s visual identity to your content.
- Customize Templates: Choose a template and easily replace its elements with your brand’s colors, fonts, and logo. This ensures your content is on-brand and looks professional.
WHY IT MATTERS…
Setting up a brand kit in Canva significantly enhances your content creation process. It ensures that all your visuals are consistent, professional, and easily recognizable by your audience. By having your brand elements organized and readily available, you save time and effort, allowing you to focus more on creating quality content.
In summary, a brand kit in Canva is a powerful tool for any business or personal brand. It provides the structure and resources needed to maintain a cohesive brand identity, streamlining the design process and elevating the quality of your content. If you haven’t set up your brand kit yet, now is the perfect time to get started and take your branding to the next level.


